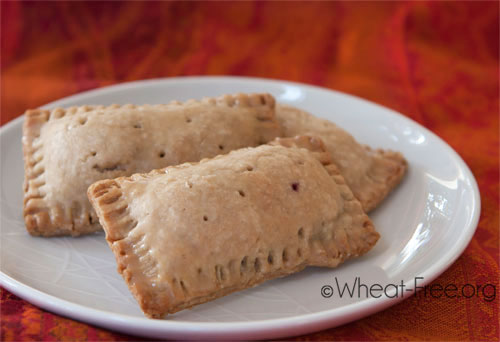
Blueberry toaster pastries recipe
“Ideal for bagged lunches or hot from the toaster oven as an afternoon treat”

Allergy Information
| Wheat-Free | |
| Gluten-Free | |
| Nut-Free | |
| Dairy-Free | |
| Sugar-Free | |
| Vegetarian | |
| Vegan |
- Preparation time: 2 hrs
- Cook time: 25 mins
- Total time: 2 hrs 25 mins
- Yield: makes 8
This Blueberry Toaster Pastries recipe is reproduced with permission from Laurie Sadowski, author of The Allergy-Free Cook Makes Pies and Desserts . The wheat-free kitchen has also reviewed the book, check out our book review.
I really liked these Blueberry Toaster Pastries, as did the other tasters. The pastry was crisp and buttery tasting, and it didn't crumble—making these an ideal school lunch item as they are pretty robust and don't fall to pieces when you eat them.
They're low in refined sugar which is also a real advantage, and still taste sweet but without the massive sugar rush you get from commercially produced toaster pastries. They also taste great cold.
Ingredients (Measures: Metric | US)
Blueberry jam filling:
Pastry crust:
Vanilla glaze:
Directions
To make the filling:
- Put the blueberries, lemon juice, maple syrup, and salt in a medium saucepan.
- Cook over medium heat, stirring occasionally, until the blueberries are juicy, bubbling, and soft enough to mash with a fork, about 10 minutes.
- Mash until smooth.
- Stir in the chia seeds with a spoon until well distributed.
- Let cool to room temperature.
- Refrigerate until cold, at least 2 hours.
To make the crust:
- Line a baking sheet with parchment paper.
- Put the sorghum flour, tapioca flour, quinoa flour, sugar, xanthan gum, and salt in a medium bowl, a food processor, or the bowl of a stand mixer and stir with a dry whisk to combine.
- *The recipe directs you to three alternative methods of making the pastry dough using either the hand, food processor, or stand mixer method. So we suggest that you make the pastry your preferred way, then resume the the recipe instructions at step 4.
- Knead up to 1 tbsp of additional water into the dough if needed to hold it together
- Divide the dough into two equal pieces. Lightly flour a clean surface with tapioca flour.
- Put one piece of the dough on the surface. Lightly dust a rolling pin with tapioca flour and roll out the dough, forming a rectangle about 8 1/2" x 7 1/2".
- Trim the edges using a knife so they're straight on all four sides and cut the dough into eight equal rectangles.
To fill and bake the pastries:.
Preheat oven: 200°C, 400°F, Gas 6
- Transfer one rectangle of dough to the prepared pan using a pastry scraper or butter knife.
- Spoon about 2 tsp of the filling onto the dough, spreading it down the middle of the rectangle and avoiding the edges.
- Repeat with the remaining dough and filling.
- The jam filling recipe makes extra, and the leftovers can be stored in the refrigerator in a sealed jar for one week.
- Roll and cut the second piece of dough into eight rectangles of the same size.
- Using a pastry knife or your fingers, carefully position a rectangle of dough on top of a filled rectangle.
- Press down lightly so the top is flat; however, don't press down so hard that the filling spreads to the edges.
- Press the tines of a fork around the edges of the dough to seal in the filling.
- Poke the top six times with a wooden skewer.
- Repeat with the remaining dough, making eight pastries.
- Put the pastries in the freezer for 30 minutes.
- After the pastries have been in the freezer for about 20 minutes, preheat the oven to 400 degrees F.
- Position an oven rack in the lower third of the oven.
- Remove the pastries from the freezer. Brush with non-dairy milk and sprinkle with sugar.
- Bake in the lower third of the oven rack for 25 to 28 minutes, until golden on the edges (if you're using a dark pan, the pastries will bake much more quickly, so check them after 15 minutes).
- Let cool completely before glazing.
To make the glaze:
- Put the confectioners' sugar in a small bowl.
- Add the vanilla extract and the non-dairy milk and stir until well combined and smooth.
- The glaze should be just thin enough to spread. If it's not, stir in additional non-dairy milk until the desired consistency is achieved.
- Use a pastry brush to coat the tops of the pastries.
- Let the glaze set completely before serving or storing.
- TIP: If you plan to toast the pastries, forgo the glaze and store the pastries, covered, at room temperature. Pop a pastry in the toaster or toaster oven, then glaze as directed.
Per Blueberry Toaster Pastry: calories 216, protein 3g, fat 13g, sat fat 3g, carbohydrate 23g, fibre 3g, sodium 172mg, calcium 19mg
This recipe is copyright © Laurie Sadowski, The Allergy-Free Cook Makes Pies and Desserts

